
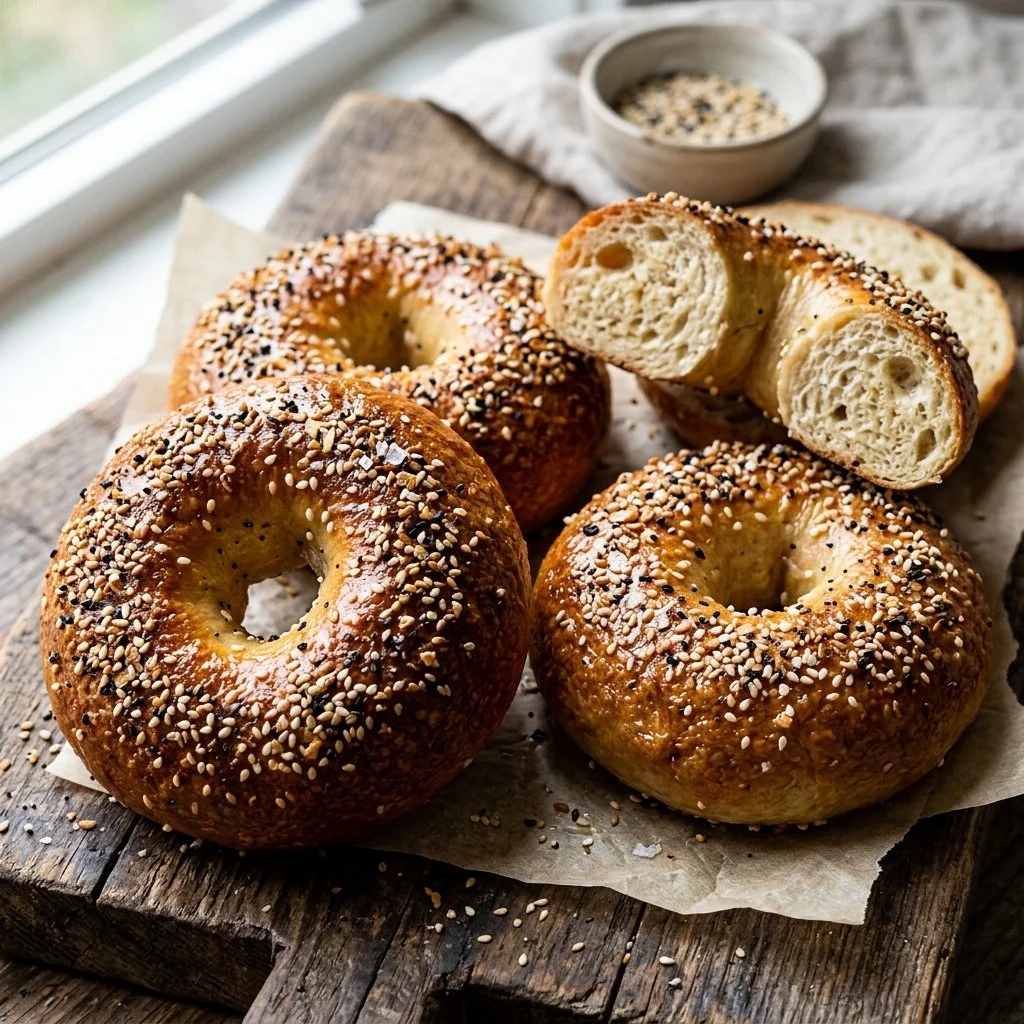
Bagels have a special place in my heart—not just as a breakfast option but as a beloved ritual. I remember the delightful mornings spent in my grandmother’s cozy kitchen, the smell of freshly baked bread wafting through the air as she expertly spun the dough, shaping it into perfect, plump rounds. Bagels were her specialty, expertly crafted and boiled until they sported that glossy, chewy crust we all long for. Today, I want to share my own version of this treasured recipe, inviting you to create your own bagel tradition at home.
Recipe Timing
- Prep Duration: 15 minutes
- Active Cooking: 10 minutes
- Total Duration: Approximately 1 hour 45 minutes (including rising and baking)
- Portion Size: 8 bagels
- Complexity: Simple
Nutritional Recipe
- Calories per portion: Approximately 190
- Protein: 6g per serving
- Carbs: 37g per serving
- Fats: 1g per serving
- Fiber: 1.5g per serving
- Sugars: 1g per serving
- Sodium: 190mg per serving
Why You’ll Love This Homemade Bagels
There’s something truly magical about homemade bagels. They embody the perfect combination of chewy and crispy, offering a warm embrace of flavor that store-bought versions simply can’t match. With each bite, you’re treated to the satisfaction of fresh bread, hot from the oven, customizable with your favorite toppings—from classic sesame and poppy seeds to coarse salts and beyond. Plus, the joy of creating these delightful rings of dough is a rewarding experience that’s perfect for sharing with family and friends.
The Complete Cooking Journey
Get ready for a delightful whirlwind of mixing, kneading, boiling, and baking as we embark on this homemade bagel adventure. The process may seem intricate, but each step is straightforward and full of satisfaction.
Ingredients:
- 4 cups bread flour
- 2 teaspoons instant yeast
- 1 tablespoon sugar
- 1 teaspoon salt
- 1 1/2 cups warm water
- 1 tablespoon baking soda
- Toppings (e.g., sesame seeds, poppy seeds, coarse salt)
Method:
Step 1: Mix Your Base
In a large bowl, combine flour, yeast, sugar, and salt. Gradually add the warm water and mix until a dough forms.
Step 2: Knead the Dough
Knead the dough on a floured surface for about 10 minutes until it’s smooth and elastic.
Step 3: Let It Rise
Place the dough in a greased bowl, cover it, and let it rise for about 1 hour until it has doubled in size.
Step 4: Shape the Bagels
Punch the dough down and divide it into 8 equal pieces. Shape each piece into a ball and poke a hole in the center to form bagels.
Step 5: Preheat Your Oven
Preheat the oven to 425°F (220°C), setting the stage for the glorious baking to come.
Step 6: Boil the Bagels
Bring a large pot of water to a boil and add the baking soda. Boil each bagel for about 1 minute on each side to achieve that signature chewiness.
Step 7: Prepare for Baking
Remove the boiled bagels and place them on a baking sheet lined with parchment paper.
Step 8: Add Toppings
Sprinkle your desired toppings on the bagels if you’re feeling adventurous!
Step 9: Bake to Perfection
Bake for 20-25 minutes until they are golden brown and your kitchen is filled with an irresistible aroma.
Step 10: Cool and Enjoy
Let the bagels cool before serving, so the flavors can settle down, and they’re perfectly chewy when you bite into them.
Serving Suggestions & Pairings
Homemade bagels are a versatile canvas for your culinary creativity. Serve them warm with a smear of cream cheese and a sprinkle of fresh chives, or load them up with smoked salmon, capers, and a zesty dill cream. For a more indulgent treat, try filling them with your favorite spreads, jams, or avocado for a nutritious breakfast or brunch option.
Storage & Leftovers Guide
These bagels can be stored in an airtight container at room temperature for up to three days. If you find yourself with leftovers, wrap them well and they’ll stay fresh in the freezer for up to a month. Simply pop them in the toaster when you’re ready to enjoy!
Kitchen Wisdom & Success Tips
- Make sure your water is warm, not hot; it should feel like a comfortable bath to your wrist. This will help activate the yeast without killing it.
- For a touch of sweetness, add a teaspoon of honey to your boiling water; it helps achieve a richer color on your bagels.
- Don’t be afraid to experiment with different toppings. You can even mix in herbs or spices into the dough for added flavor!
Flavor Variations & Adaptations
Feeling adventurous? Try adding ingredients into the dough like garlic powder, onion flakes, or even cheese before shaping. You can also play with toppings; think everything bagels (with garlic, onion, sesame, and poppy seeds) or even sweet cinnamon sugar-coated bagels that you can serve with coffee.
Reader Questions & Solutions
-
Q: My dough didn’t rise. What happened?
A: Ensure your yeast is fresh; if it doesn’t bubble in warm water, it’s not active. Also, let your dough rise in a warm place, away from drafts. -
Q: Can I use all-purpose flour instead of bread flour?
A: Yes, but the bagels may be slightly less chewy. Bread flour has more gluten, which contributes to that expected texture. -
Q: I’ve never boiled bagels before. Is it important?
A: Absolutely! Boiling the bagels before baking gives them that characteristic chewy crust. Don’t skip this step! -
Q: How do I know when my bagels are done?
A: Look for a golden-brown exterior; they should feel firm to the touch. You can tap the bottom; it should sound hollow when cooked through. -
Q: Can I make the dough ahead of time?
A: Yes! After kneading, you can refrigerate the dough for up to 2 days. Just let it come to room temperature before shaping.
Wrapping Up
There’s truly nothing like the taste of homemade bagels, warm and fresh from your oven. With these step-by-step instructions, I hope you’re inspired to roll up your sleeves and create your own batch, adding your personal touch along the way. Each bite can carry memories, aromas, and flavors waiting to be discovered, waiting for you to bake them into your kitchen routine. So, gather your ingredients, get started, and let those beautiful bagels bring warmth to your home, just as they did to mine. Happy baking!
PrintHomemade Bagels
Delicious homemade bagels with a perfect chewy crust, reminiscent of cherished family traditions.
- Prep Time: 15 minutes
- Cook Time: 30 minutes
- Total Time: 105 minutes
- Yield: 8 bagels 1x
- Category: Breakfast
- Method: Baking
- Cuisine: American
- Diet: Vegetarian
Ingredients
- 4 cups bread flour
- 2 teaspoons instant yeast
- 1 tablespoon sugar
- 1 teaspoon salt
- 1 1/2 cups warm water
- 1 tablespoon baking soda
- Toppings (e.g., sesame seeds, poppy seeds, coarse salt)
Instructions
- Mix the flour, yeast, sugar, and salt in a large bowl. Gradually add the warm water and mix until a dough forms.
- Knead the dough on a floured surface for about 10 minutes until it’s smooth and elastic.
- Let the dough rise in a greased bowl, covered, for about 1 hour until it has doubled in size.
- Shape the bagels by punching the dough down, dividing it into 8 equal pieces, and poking a hole in the center of each piece.
- Preheat the oven to 425°F (220°C).
- Boil each bagel in a large pot of boiling water with baking soda for about 1 minute on each side.
- Prepare a baking sheet lined with parchment paper and place the boiled bagels on it.
- Add your desired toppings on the bagels.
- Bake for 20-25 minutes until golden brown.
- Cool the bagels before serving.
Notes
Experiment with toppings and add flavors like garlic powder or cheese into the dough for variations.
Nutrition
- Serving Size: 1 bagel
- Calories: 190
- Sugar: 1g
- Sodium: 190mg
- Fat: 1g
- Saturated Fat: 0g
- Unsaturated Fat: 0g
- Trans Fat: 0g
- Carbohydrates: 37g
- Fiber: 1.5g
- Protein: 6g
- Cholesterol: 0mg